前言
撸了几个棒子,然后索然无味了,最后只能刷个openwrt和debian了,openwrt感觉没啥可以折腾的,还是debian还能折腾点。
debian可以安装宝塔或者青龙折腾下,但是棒子那个512的ram 实际能用就300M,去掉modem后能用的就400M。实在不适合折腾太多。
安装
来源酷安jsbsbxjxh66 :https://www.coolapk.com/feed/41664623?shareKey=ZjgwZGM2NWE5MGEwNjM5OTcwMzM~&shareUid=20775713&shareFrom=com.coolapk.market_12.5.0
说明(点开)
1.各个型号已经替换了相应的基带文件
2.安装了一些必备软件包
3.增加了rc.local开机自动执行服务修改/etc/rc.local文件可加入一些开机要执行的命令
4.刷入自带热点4G-wifi 密码:12345678
5.ssh连接地址10.42.0.1
ssh root@10.42.0.1 密码:1313144
6.加入了这些型号串口驱动ch341/ch342/ch343/ch344/ch347/ch9101/ch9102/ch9103/ch9143
7.各大网络文件系统全部编译上了如:NFS CIFS SMB AFS等等能编译的全编译了能不能用就不知道了
8.删除热点连wifi:nmtui > 编译连接 > 删除wifi热点 >返回 > 启用连接(里面连wifi)
9.usb和热点不需要桥接如要重新开启热点看上面网络配置模板
10.usb有线网卡驱动能编译的都编译了自己看上面图片
11.系统是带adb的需要更新adb驱动才能usb网络共享如何更新看原作者项目地址:https://www.kancloud.cn/handsomehacker/openstick/2636506
12.修正了一下以前超频版的频率表(16v3的设备树不知道能用不不能用刷001c的)
@@@@刷完棒子开机后会重启一遍才会有热点刷完先别动。
下载地址:
链接: https://cloud.189.cn/t/neAnmabAnYji (访问码:6nti)
备用:https://www.123pan.com/s/2CjDVv-XHhxd.html 提取码:a6LY
ssh账号密码(jsbsbxjxh66超频版):
root
1313144
优化
查看debian版本
1、cat /etc/os-release
2、hostnamectl
3、cat /etc/issue
更换国内原
1、备份现有源
sudo cp /etc/apt/sources.list /etc/apt/sources.list_bak
2、一般情况下,将 /etc/apt/sources.list 文件中 Debian 默认的源地址 http://deb.debian.org/ 替换为国内源即可。
安装CA:
apt install apt-transport-https ca-certificates查看编辑
nano /etc/apt/sources.list
nano操作手册
1、启动Nano:在命令行中输入nano,回车即可启动。
2、打开文件:使用命令nano file_name即可打开文件。
3、保存文件:按Ctrl + O即可保存文件。
4、退出Nano:按Ctrl + X即可退出Nano。
5、撤销:按Ctrl + U即可撤销最近的操作。
6、搜索:按Ctrl + W即可搜索文本。
7、替换:按Ctrl + R即可替换文本。
8、移动光标:您可以使用方向键来移动光标。
9、复制和粘贴:您可以使用Ctrl + K来复制当前行,使用Ctrl + U来粘贴。
10、拆分和合并行:您可以使用Ctrl + J来拆分当前行,使用Ctrl + O来合并当前行和下一行。
11、修改文件名:在保存文件时,您可以使用Ctrl + O打开“保存文件”对话框,在对话框中输入新文件名即可修改文件名。
12、在文件末尾插入新行:您可以使用Ctrl + O打开“保存文件”对话框,然后在对话框中输入+$即可在文件末尾插入新行。
#中国科技大学
sudo sed -i 's/deb.debian.org/mirrors.ustc.edu.cn/g' /etc/apt/sources.list
#163网易云
sudo sed -i 's/deb.debian.org/mirrors.163.com/g' /etc/apt/sources.list
#阿里云
sudo sed -i 's/deb.debian.org/mirrors.aliyun.com/g' /etc/apt/sources.list
#清华同方
sudo sed -i 's/deb.debian.org/mirrors.tuna.tsinghua.edu.cn/g' /etc/apt/sources.list
国内源列表
#中科大镜像站
deb https://mirrors.ustc.edu.cn/debian/ bullseye main contrib non-free
deb-src https://mirrors.ustc.edu.cn/debian/ bullseye main contrib non-free
deb https://mirrors.ustc.edu.cn/debian/ bullseye-updates main contrib non-free
deb-src https://mirrors.ustc.edu.cn/debian/ bullseye-updates main contrib non-free
deb https://mirrors.ustc.edu.cn/debian/ bullseye-backports main contrib non-free
deb-src https://mirrors.ustc.edu.cn/debian/ bullseye-backports main contrib non-free
deb https://mirrors.ustc.edu.cn/debian-security/ bullseye-security main contrib non-free
deb-src https://mirrors.ustc.edu.cn/debian-security/ bullseye-security main contrib non-free
清华大学镜像站
deb https://mirrors.tuna.tsinghua.edu.cn/debian/ bullseye main contrib non-free
deb-src https://mirrors.tuna.tsinghua.edu.cn/debian/ bullseye main contrib non-free
deb https://mirrors.tuna.tsinghua.edu.cn/debian/ bullseye-updates main contrib non-free
deb-src https://mirrors.tuna.tsinghua.edu.cn/debian/ bullseye-updates main contrib non-free
deb https://mirrors.tuna.tsinghua.edu.cn/debian/ bullseye-backports main contrib non-free
deb-src https://mirrors.tuna.tsinghua.edu.cn/debian/ bullseye-backports main contrib non-free
deb https://mirrors.tuna.tsinghua.edu.cn/debian-security bullseye-security main contrib non-free
deb-src https://mirrors.tuna.tsinghua.edu.cn/debian-security bullseye-security main contrib non-free
#阿里镜像源
deb https://mirrors.aliyun.com/debian/ bullseye main non-free contrib
deb-src https://mirrors.aliyun.com/debian/ bullseye main non-free contrib
deb https://mirrors.aliyun.com/debian-security/ bullseye-security main
deb-src https://mirrors.aliyun.com/debian-security/ bullseye-security main
deb https://mirrors.aliyun.com/debian/ bullseye-updates main non-free contrib
deb-src https://mirrors.aliyun.com/debian/ bullseye-updates main non-free contrib
deb https://mirrors.aliyun.com/debian/ bullseye-backports main non-free contrib
deb-src https://mirrors.aliyun.com/debian/ bullseye-backports main non-free contrib
#腾讯
deb https://mirrors.tencent.com/debian/ bullseye main non-free contrib
deb-src https://mirrors.tencent.com/debian/ bullseye main non-free contrib
deb https://mirrors.tencent.com/debian-security/ bullseye-security main
deb-src https://mirrors.tencent.com/debian-security/ bullseye-security main
deb https://mirrors.tencent.com/debian/ bullseye-updates main non-free contrib
deb-src https://mirrors.tencent.com/debian/ bullseye-updates main non-free contrib
deb https://mirrors.tencent.com/debian/ bullseye-backports main non-free contrib
deb-src https://mirrors.tencent.com/debian/ bullseye-backports main non-free contrib
#华为镜像站
#deb https://mirrors.huaweicloud.com/debian/ bullseye main non-free contrib
#deb-src https://mirrors.huaweicloud.com/debian/ bullseye main non-free contrib
#deb https://mirrors.huaweicloud.com/debian-security/ bullseye-security main
#deb-src https://mirrors.huaweicloud.com/debian-security/ bullseye-security main
#deb https://mirrors.huaweicloud.com/debian/ bullseye-updates main non-free contrib
#deb-src https://mirrors.huaweicloud.com/debian/ bullseye-updates main non-free contrib
#deb https://mirrors.huaweicloud.com/debian/ bullseye-backports main non-free contrib
#deb-src https://mirrors.huaweicloud.com/debian/ bullseye-backports main non-free contrib
#网易镜像站
#deb https://mirrors.163.com/debian/ bullseye main non-free contrib
#deb-src https://mirrors.163.com/debian/ bullseye main non-free contrib
#deb https://mirrors.163.com/debian-security/ bullseye-security main
#deb-src https://mirrors.163.com/debian-security/ bullseye-security main
#deb https://mirrors.163.com/debian/ bullseye-updates main non-free contrib
#deb-src https://mirrors.163.com/debian/ bullseye-updates main non-free contrib
#deb https://mirrors.163.com/debian/ bullseye-backports main non-free contrib
#deb-src https://mirrors.163.com/debian/ bullseye-backports main non-free contrister/updates main contrib non-free
3、更新索引以生效。
sudo apt-get update折腾
1.安装宝塔:
wget -O install.sh https://download.bt.cn/install/install-ubuntu_6.0.sh && bash install.sh ed8484bec
2.单独安装docker
2.1 系统要求
Docker 支持以下版本的 Debian (opens new window)操作系统:
Debian Bullseye 11
Debian Buster 10
2.2 卸载旧版本
旧版本的 Docker 称为 docker 或者 docker-engine,使用以下命令卸载旧版本:
sudo apt-get remove docker \
docker-engine \
docker.io
2.3 使用 APT 安装
由于 apt 源使用 HTTPS 以确保软件下载过程中不被篡改。因此,我们首先需要添加使用 HTTPS 传输的软件包以及 CA 证书。
sudo apt-get update
sudo apt-get install \
apt-transport-https \
ca-certificates \
curl \
gnupg \
lsb-release
为了确认所下载软件包的合法性,需要添加软件源的 GPG 密钥。
curl -fsSL https://mirrors.aliyun.com/docker-ce/linux/debian/gpg | sudo gpg --dearmor -o /usr/share/keyrings/docker-archive-keyring.gpg
## 官方源
# $ curl -fsSL https://download.docker.com/linux/debian/gpg | sudo gpg --dearmor -o /usr/share/keyrings/docker-archive-keyring.gpg
2.4 向 sources.list 中添加 Docker 软件源:
在一些基于 Debian 的 Linux 发行版中 $(lsb_release -cs) 可能不会返回 Debian 的版本代号,例如 Kail Linux (opens new window)、 BunsenLabs Linux (opens new window)。
在这些发行版中我们需要将下面命令中的 $(lsb_release -cs) 替换为 https://mirrors.aliyun.com/docker-ce/linux/debian/dists/ 中支持的 Debian 版本代号,例如 buster。
echo \
"deb [arch=amd64 signed-by=/usr/share/keyrings/docker-archive-keyring.gpg] https://mirrors.aliyun.com/docker-ce/linux/debian \
$(lsb_release -cs) stable" | sudo tee /etc/apt/sources.list.d/docker.list > /dev/null
# 官方源
# $ echo \
# "deb [arch=amd64 signed-by=/usr/share/keyrings/docker-archive-keyring.gpg] https://download.docker.com/linux/debian \
# $(lsb_release -cs) stable" | sudo tee /etc/apt/sources.list.d/docker.list > /dev/null
以上命令会添加稳定版本的 Docker APT 源,如果需要测试版本的 Docker 请将 stable 改为 test。
2.5 安装 Docker
更新 apt 软件包缓存,并安装 docker-ce。
sudo apt-get updatesudo apt-get install docker-ce docker-ce-cli containerd.io docker-compose-plugin2.6 一键脚本快速安装:
在测试或开发环境中 Docker 官方为了简化安装流程,提供了一套便捷的安装脚本,Debian 系统上可以使用这套脚本安装Docker 的稳定(stable)版本,另外可以通过 --mirror 选项使用国内源进行安装:
curl -fsSL get.docker.com -o get-docker.sh
sudo sh get-docker.sh --mirror Aliyun
执行这个命令后,脚本就会自动的将一切准备工作做好,并且把 。
#启动 Docker
sudo systemctl enable docker
$ sudo systemctl start docker
2.7 配置镜像加速
请首先执行以下命令,查看是否在 docker.service 文件中配置过镜像地址。
systemctl cat docker | grep '\-\-registry\-mirror'如果该命令有输出,那么请执行 systemctl cat docker 查看 ExecStart= 出现的位置,修改对应的文件内容去掉 --registry-mirror 参数及其值,并按接下来的步骤进行配置。
如果以上命令没有任何输出,那么就可以在/etc/docker/daemon.json 中写入如下内容(如果文件不存在请新建该文件):
<span class="line">sudo mkdir -p /etc/docker</span>
<span class="line">sudo tee /etc/docker/daemon.json <<EOF</span>
<span class="line">{</span>
<span class="line"> "registry-mirrors": [</span>
<span class="line"> "https://ustc-edu-cn.mirror.aliyuncs.com/",</span>
<span class="line"> "https://hub-mirror.c.163.com/"</span>
<span class="line"> ]</span>
<span class="line">}</span>
<span class="line">EOF</span>
2.8 重启 docker 并设置开机自启
sudo systemctl enable docker
sudo systemctl daemon-reload
sudo systemctl restart docker
2.9 安装 Docker Compose
export LATEST_VERSION=$(curl "https://api.github.com/repos/docker/compose/releases/latest" | grep "tag_name" | head -n 1 | awk -F ":" '{print $2}' | sed 's/\"//g;s/,//g;s/ //g')
curl -o ./docker-compose -L https://github.com/docker/compose/releases/download/$LATEST_VERSION/docker-compose-linux-`uname -m`
sudo chmod +x ./docker-compose
sudo mv ./docker-compose /usr/local/bin/docker-compose
Docker扩展
我就不造轮子了,可以参照这篇文章:https://songw.top/archives/277.html
个人笔记手册
一、连接网络与设置
1.配置网络环境
export TERM=linux2.进入网络管理
sudo nmtui3.修改root用户密码
passwd root 密码二.安装基本软件
1.更新软件列表并安装wget和curl
sudo apt-get update
apt-get install wget
apt-get install curl
2.安装fastos docker面板/portainer面板
###安装可视化面板fastos docker
docker run --name fastos --restart always -p 8081:8081 -p 8082:8082 -d \
-v /var/run/docker.sock:/var/run/docker.sock -v /etc/docker/:/etc/docker/ \
-v /root/data:/fast/data -e FAST_STORE=http://dockernb.com:8300 wangbinxingkong/fast:latest
ps:首次登录需要注册,注册成功后即可正常使用
可视化面板项目地址:https://hub.docker.com/r/wangbinxingkong/fast
###安装portainer面板
docker run -d -p 8080:9000 --restart=always -v /var/run/docker.sock:/var/run/docker.sock --name prtainer portainer/portainer汉化包地址:https://www.u-share.cn/forum.php?mod=viewthread&tid=192866&highlight=portainer
3.设置DDNS
项目地址:https://github.com/jeessy2/ddns-go
//拉取ddns镜像并部署
docker run -d --name ddns-go --restart=always --net=host jeessy/ddns-go
-
在浏览器中打开
http://主机IP:9876,修改你的配置,成功 - [可选] 支持启动带参数
-l监听地址-f间隔时间(秒)
docker run -d --name ddns-go --restart=always --net=host jeessy/ddns-go -l :9877 -f 600
三.进阶部分
1.开启ssh登陆root账户
安装nano编辑器:
sudo apt-get install nano或者安装vim编辑器:
apt install -y vim编辑sshd_config:
sudo nano /etc/ssh/sshd_config将34行#PermitRootLogin prohibit-password改为PermitRootLogin yes
将58行#PasswordAuthentication yes的#去掉
reboot重启
2.修改host加速GitHub访问
使用winscp打开/etc/hosts,并加入以下内容(末尾为项目地址)
# GitHub520 Host Start
140.82.112.25                 alive.github.com
140.82.112.25                 live.github.com
185.199.108.154               github.githubassets.com
140.82.112.21                 central.github.com
185.199.108.133               desktop.githubusercontent.com
185.199.108.153               assets-cdn.github.com
185.199.108.133               camo.githubusercontent.com
185.199.108.133               github.map.fastly.net
199.232.69.194                github.global.ssl.fastly.net
140.82.113.4                  gist.github.com
185.199.108.153               github.io
140.82.114.4                  github.com
192.0.66.2                    github.blog
140.82.114.6                  api.github.com
185.199.108.133               raw.githubusercontent.com
185.199.108.133               user-images.githubusercontent.com
185.199.108.133               favicons.githubusercontent.com
185.199.108.133               avatars5.githubusercontent.com
185.199.108.133               avatars4.githubusercontent.com
185.199.108.133               avatars3.githubusercontent.com
185.199.108.133               avatars2.githubusercontent.com
185.199.108.133               avatars1.githubusercontent.com
185.199.108.133               avatars0.githubusercontent.com
185.199.108.133               avatars.githubusercontent.com
140.82.112.10                 codeload.github.com
52.216.21.147                 github-cloud.s3.amazonaws.com
52.217.229.65                 github-com.s3.amazonaws.com
52.217.96.28                  github-production-release-asset-2e65be.s3.amazonaws.com
52.217.77.92                  github-production-user-asset-6210df.s3.amazonaws.com
52.217.172.9                  github-production-repository-file-5c1aeb.s3.amazonaws.com
185.199.108.153               githubstatus.com
64.71.144.202                 github.community
23.100.27.125                 github.dev
140.82.114.21                 collector.github.com
13.107.43.16                  pipelines.actions.githubusercontent.com
185.199.108.133               media.githubusercontent.com
185.199.108.133               cloud.githubusercontent.com
185.199.108.133               objects.githubusercontent.com

# Update time: 2022-02-24T14:06:14+08:00
# Update url: https://raw.hellogithub.com/hosts
# Star me: https://github.com/521xueweihan/GitHub520
# GitHub520 Host End
重启生效
3.设置USB拓展
切换USB模式
vi /usr/sbin/mobian-usb-gadget
在setup()最开头添加代码实现开机切换,所有usb device功能将会失效。
echo host > /sys/kernel/debug/usb/ci_hdrc.0/role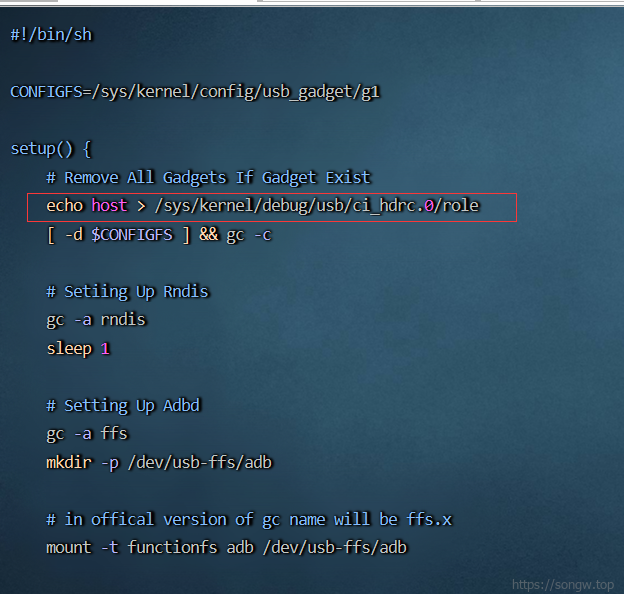
挂载外接存储
fdisk -l
sudo mount -t /sd?1 /你要挂载的目录(?字母参考上条代码输出路径)
(如显示fdisk未安装)
sudo apt-get install -y fdisk例子:
mkdir /mnt/sda1sudo mount -t auto /dev/sda1 /mnt/sda1卸载:sudo umount /dev/sda1 /mnt/sda1
3.1显示没有写权限的解决方案(NTFS)
安装ntfs-3g:
sudo apt<span class="token operator">-</span><span class="token keyword">get</span> install libfuse2
sudo apt<span class="token operator">-</span><span class="token keyword">get</span> install ntfs<span class="token operator">-</span><span class="token number">3</span>g
修复NTFS:
sudo ntfsfix /dev/sd?1返回结果:
Mounting volume… The disk contains an unclean file system (0, 0). Metadata kept in Windows cache, refused to mount. FAILED Attempting to correct errors… Processing $MFT and $MFTMirr… Reading $MFT… OK Reading $MFTMirr… OK Comparing $MFTMirr to $MFT… OK Processing of $MFT and $MFTMirr completed successfully. Setting required flags on partition… OK Going to empty the journal ($LogFile)… OK Checking the alternate boot sector… OK NTFS volume version is 3.1. NTFS partition /dev/vdb2 was processed successfully.最后正常挂载:
mount -t ntfs /dev/ad?1 /xxx安装 samba
apt install samba samba-common-bin -yvi /etc/samba/smb.conf[global]
workgroup = <span class="hljs-type">SAMBA</span>
<span class="hljs-variable">security</span> <span class="hljs-operator">=</span> user
<span class="hljs-type">passdb</span> <span class="hljs-variable">backend</span> <span class="hljs-operator">=</span> <span class="hljs-type">tdbsam</span>
<span class="hljs-variable">printing</span> <span class="hljs-operator">=</span> cups
<span class="hljs-type">printcap</span> <span class="hljs-variable">name</span> <span class="hljs-operator">=</span> cups
<span class="hljs-type">load</span> <span class="hljs-variable">printers</span> <span class="hljs-operator">=</span> yes
<span class="hljs-type">cups</span> <span class="hljs-variable">options</span> <span class="hljs-operator">=</span> raw
[database]
comment = Debian <span class="hljs-comment">//目录名称</span>
path = /home <span class="hljs-comment">//设置home目录为samba共享目录</span>
<span class="hljs-keyword">public</span> = <span class="hljs-type">no</span>
<span class="hljs-variable">writable</span> <span class="hljs-operator">=</span> yes
设置samba 密码
sudo smbpasswd -a root重启samba
sudo samba restart3.2通过udisks2安全弹出外接硬盘
卸载挂载点。相当与(umount /devsda1):
udisksctl unmount -b /dev/sda1
安全关闭驱动器:
udisksctl power-off -b /dev/sda1参考:https://qastack.cn/unix/178638/eject-safely-remove-vs-umount
3.2-1通过udisks2断电外接硬盘
udisksctl power-off --block-device /dev/sdb参考:https://forum.ubuntu.org.cn/viewtopic.php?t=480394
3.3关闭LED灯
参考openstick Wiki
cd /sys/class/leds/red:os echo usb-gadget > trigger cd /sys/class/leds/blue:wifi echo usb-gadget > trigger4.安装OMV
4.1.卸载重装python3
1、卸载python3
sudo apt-get remove python32、卸载python3及其依赖
sudo apt-get remove --auto-remove python33、清除python3
sudo apt-get purge python3or
sudo apt-get purge --auto-remove python34.安装python3
sudo apt-get install python34.2.修改hosts,拉取一键安装脚本
通过该网站获取github以及raw的地址
raw.Githubusercontent.com | Easy, Fast and FREE (ipaddress.com)
把ip加入/etc/hosts中即可
185.199.108.133 raw.githubusercontent.com
完成hosts添加后,往下
一键安装omv脚本项目地址:OpenMediaVault-Plugin-Developers/installScript: script that installs omv-extras and openmediavault if not installed already. (github.com)
离线安装:
wget https://github.com/OpenMediaVault-Plugin-Developers/installScript/raw/master/install chmod +x install sudo ./install -ncurl拉取(适用于网络条件差的情况):
sudo curl -sSL https://github.com/OpenMediaVault-Plugin-Developers/installScript/raw/master/install | sudo bash执行sudo ./install -n 开始自动安装,等待安装完成即可
4.3.报错解决办法
填坑:解决Unit file is masked问题
在某些机器(如VPS)上手动安装OMV时,常常会出现“Unit file is masked”的问题。该问题非常致命,会中断OMV后续的安装进程。
Failed to preset unit: Unit file /etc/systemd/system/openmediavault-cleanup-php.service is masked.
/usr/bin/deb-systemd-helper: error: systemctl preset failed on openmediavault-cleanup-php.service: No such file or directory
dpkg: error processing package openmediavault (--configure):
installed openmediavault package post-installation script subprocess returned error exit status 1
Errors were encountered while processing:
openmediavault
E: Sub-process /usr/bin/dpkg returned an error code (1)
实际上,了解systemd对服务的管理机制,就不难得知,这里的“mask”是系统服务的一个状态,相当于被“屏蔽”。据此,解决办法很简单,但凡有一个服务提示被masked,就运行下面的命令来unmask,然后重新安装,直到安装过程能够顺利继续:
# systemctl unmask <被报错的服务名>,例如:
systemctl unmask openmediavault-cleanup-php.service
5.安装snap和hacs
为确保蓝牙功能能正常使用,需要先安装蓝牙程序
apt install bluetooth安装完成后确认蓝牙设备是否启动
hcioconfig -a显示为DOWN则未开启,手动开启
hciconfig hci0 up接下来安装snap和core
apt install snapd安装完snap后注销用户或重启
snap install core安装完成snap后,即可安装hacs(snapcraft.io)
sudo snap install home-assistant-hacs安装完成后重启,之后进入localhost:8123,手动配置HACS